Phone Guide Yealink T21P / T23G Entry Level
Yealink T21P / T23G User Guide
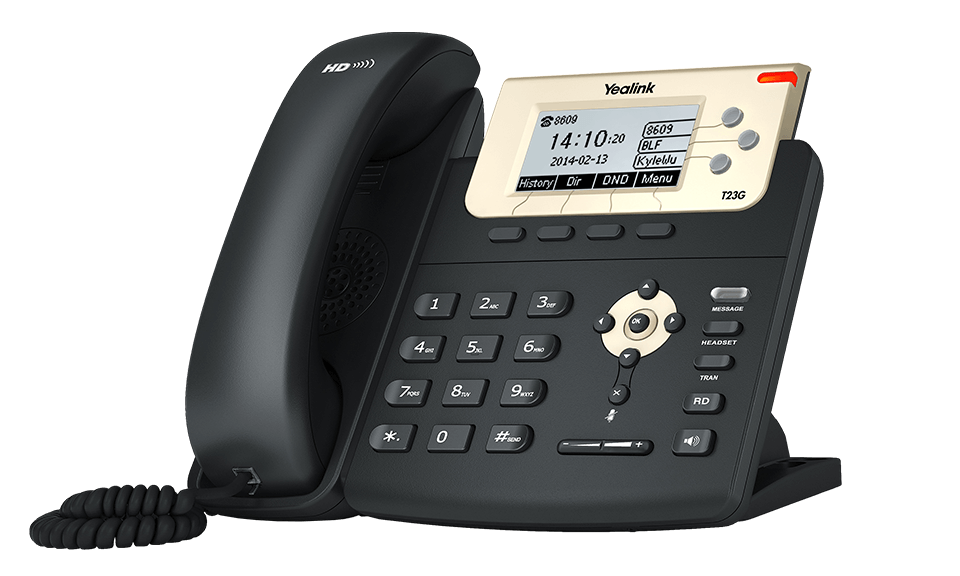
Essential reference for DVGVoIP customers using the Yealink T21P E2 or T23G entry-level IP desk phone. Both models share the same core feature set and interface.
Placing a Call
| Method | Steps |
|---|---|
| Using Handset | Pick up the handset → Dial number → Press Send |
| Using Speakerphone | Press Speakerphone → Dial number → Press Send |
| Pre-dial | Dial the number while the phone is on-hook → Pick up handset or press Send |
| Dial from Directory | Press OK button → Select Directory → Browse and select → Press Send |
| Redial | Press Redial to view recent calls, or press twice to immediately redial the last number |
Tip: The T21P / T23G does not have a dedicated headset port button on the front panel — to use a headset, connect it to the RJ-9 headset port and the audio will route automatically when you press Speakerphone with the handset down.
Answering a Call
| Method | Action |
|---|---|
| Using Handset | Pick up the handset |
| Using Speakerphone | Press Speakerphone |
| Reject / Send to Voicemail | Press the Reject soft key |
| Silence Ring | Press any soft key or navigation key to silence the ringer — call continues ringing at the caller's end |
Hold & Resume
| Action | Steps |
|---|---|
| Place on Hold | Press the Hold soft key during a call. The caller hears hold music. |
| Resume | Press the Resume soft key |
| Answer Waiting Call | Press the Answer soft key — current call is automatically placed on hold |
Transferring a Call
| Transfer Type | Steps |
|---|---|
| Blind Transfer Transfers immediately without announcing |
1. Press Tran during the call 2. Dial the extension or number 3. Press Tran again — call transfers immediately |
| Attended Transfer Announce the call before completing |
1. Press Tran during the call 2. Dial the number → Press # to ring 3. Wait for them to answer and announce the call 4. Press Tran to complete the transfer |
| Transfer to Voicemail | Press Tran → Dial *4 + extension → Press Tran |
Note: The T21P only has 2 line keys, so it supports one active call plus one held call. The T23G has 3 line keys and supports slightly more call handling flexibility.
Mute, End & Redial
| Action | Steps |
|---|---|
| Mute | Press the Mute button (mic icon) during a call. Press again to un-mute. Mute LED lights red. |
| End Call | Hang up the handset, or press the End Call soft key, or press Speakerphone if on speaker |
| Redial | Press Redial to open Placed Calls list, or press twice to call last number immediately |
Call Forwarding
Navigate to: Menu → Features → Call Forward, then choose a forward type:
| Forward Type | Behaviour |
|---|---|
| Always Forward | All incoming calls forwarded unconditionally. Enter destination → Press Save. |
| Busy Forward | Forwards when the phone is already in use. Enter destination → Press Save. |
| No Answer Forward | Forwards if not answered within the set ring time. Enter destination + ring time → Press Save. |
Note: You can also manage call forwarding from the 3CX web or mobile app — changes will sync to the phone automatically.
Conference Calling
| Action | Steps |
|---|---|
| Start a Conference |
1. During a call, press Conf soft key (first call placed on hold) 2. Dial the second party → Press Send 3. Press Conf again when they answer — all parties joined |
| End Conference | Press the End Call soft key to disconnect all parties |
| Split Conference | Press Split soft key to separate into two individual held calls (if available) |
Note: The T21P / T23G supports 3-way calling. For larger conference bridges, use the 3CX web or desktop app.
Voicemail
| Action | Steps |
|---|---|
| New Voicemail Indicator | The power LED flashes red. A message waiting icon appears on the screen. |
| Listen to Messages | Press the Message button (envelope icon), or dial 999 / 9999 → Follow voice prompts |
| From Any Extension | Dial 999 or 9999 → Press # → Enter your extension |
| From Outside | Call in to the Digital Receptionist → Dial 999 or 9999 → Enter extension → Press # |
Voicemail Menu Keys
| Key | Action | Key | Action |
|---|---|---|---|
| * | Play messages | 5 | Record self-ID message |
| 1 | Change profile status | 7 | Change voicemail PIN |
| 3 | Dial external/internal number | 8 | Change greeting |
| 4 | Delete all READ messages | # | End call |
Extension Status Codes
| Status | Dial Code |
|---|---|
| Available | *30 |
| Away | *31 |
| Out of Office | *32 |
| Do Not Disturb — On | *61 |
| Do Not Disturb — Off | *60 |
| Log In to Queue | *62 |
| Log Out of Queue | *63 |
T21P vs T23G — Key Differences
| Feature | T21P E2 | T23G |
|---|---|---|
| Line Keys | 2 | 3 |
| SIP Accounts | 2 | 3 |
| Screen | 2.3" Monochrome | 2.3" Monochrome |
| Network | 10/100 Mbps | 10/100/1000 (Gigabit) |
| PoE | Yes (802.3af) | Yes (802.3af) |
| USB Port | No | No |
| Expansion Module | Not supported | Not supported |
Recommendation: The T23G is the better choice for most installations due to its Gigabit network port and third line key. The T21P is suitable for light-use stations such as lobbies, common areas, or supplemental phones.